Tutorial: Merging Alignments and RaxML Multi-Gene analysis
In this tutorial we will create two alignments and perform a multi-gene analysis using RaxML. To get things started lets fetch data from the NCBI. I randomly picked 5 Taxa from “A multigene phylogeny of the Dothideomycetes using four nuclear loci” for the SSU and LSU regions.
Start Epos and go to File->New->Fetch from GenBank. Add the following Accession numbers for SSU:
AY584667,DQ678000,DQ678012,DQ471039,DQ678043
and for LSU:
AY584643,DQ678053,DQ678064,DQ470987,DQ678097
(Note that you can copy paste the whole line, Epos will split by comma). Hit Add and then Fetch the sequences. You will end up with 10 new sequences in your workspace. Click on the Sequences button in the main toolbar and select the SSU sequences (Epos keeps the order, so the first five should be SSU while the last five are LSU, but you can also check the description of the sequences. You can also select the sequences, right-click and select Assign->Gene… to assign SSU or LSU as gene names). With the SSU sequences selected, click the Run button in the toolbar or right click and select Run. Select ClustalW (or any other alignment method). The ClustalW configuration appears. If ClustalW is not installed on you machine, click on Install Tool to specify the path to ClustalW or Auto-install. Set the result name to “SSU” and keep the rest of the algorithm configuration. Now hit the Run button in the lower right corner. A job will be started on your local machine.
Repeat the steps for LSU. Select the LSU Sequences, click on Run and select ClustalW, set the result name to LSU and start the algorithm. Now show the Jobs manager by clicking on Jobs in the main toolbar. You should see your two ClustalW runs and they are probably already in the Done state. If not, wait until both jobs are “Done“. Now select the two jobs and press “Fetch” to load the results into your workspace. Click the Alignments button in the main toolbar and you will see a list of all alignment in your current workspace including the two ClustalW alignments for LSU and SSU.
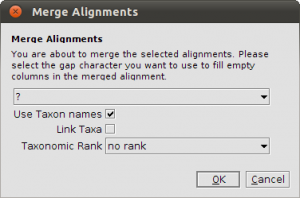
Now comes the tricky part. We have to merge the alignments to perform a multi-gene analysis. Select both alignments and click the Merge button in the toolbar. In the dialog that appears you have to check the Use Taxon names box! Because we fetched the sequences from GenBank, the Accession number is used as sequence name and the Accession numbers, of course, are not matching up. For example, AY584667 is the SSU and AY584643 is the LSU. They should appear as one row in the merged alignment. To avoid heavy renaming, we can use the taxonomic information to create a proper merge. With the sequence information, we also fetched the taxonomic information from the NCBI Taxonomy Database. Now both AY584667 and AY584643 are linked to the same taxon: Acarosporina microspora. Checking Use Taxon Names force Epos to merge based on the taxonomic information instead of the raw sequence names. Click in Okey and Epos creates the merged alignment, which will appear in the list of alignments in your workspace.
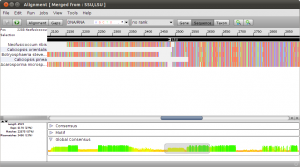
To get an idea of what happend, double click the new merged alignment. Notice the black arrows above the alignment. These are annotations on the alignment that mark different regions. In this example, the annotations represent the SSU and LSU regions in the merged alignment.
To perform a multi-gene analysis, use the Run button in the toolbar of the alignment view. You will see a list of algorithms that work on alignments. Select RAxML BS and ML to perform a rapid RaxML analysis with bootstrapping. If RaxML is not yet installed, use the Install Tool button to install it. Select a model, for example, GTRCAT and you are good to go. To verify that you are doing a multi-gene analysis, click on the small right-arrow button above the RaxML configuration parameters. You will see a table of regions used for the analysis. Here you can also choose different models for the regions if you wish. Epos automatically uses all available alignment annotations as regions for RaxML. To start the algorithm, click the Run button in the lower right corner and open the Jobs window after successful submission. When the RaxML run is finished and in Done state, double click the job to fetch the results. Click on Trees in the main toolbar to view all the trees in your workspace. The RaxML tree is also in the list.

